Introduction
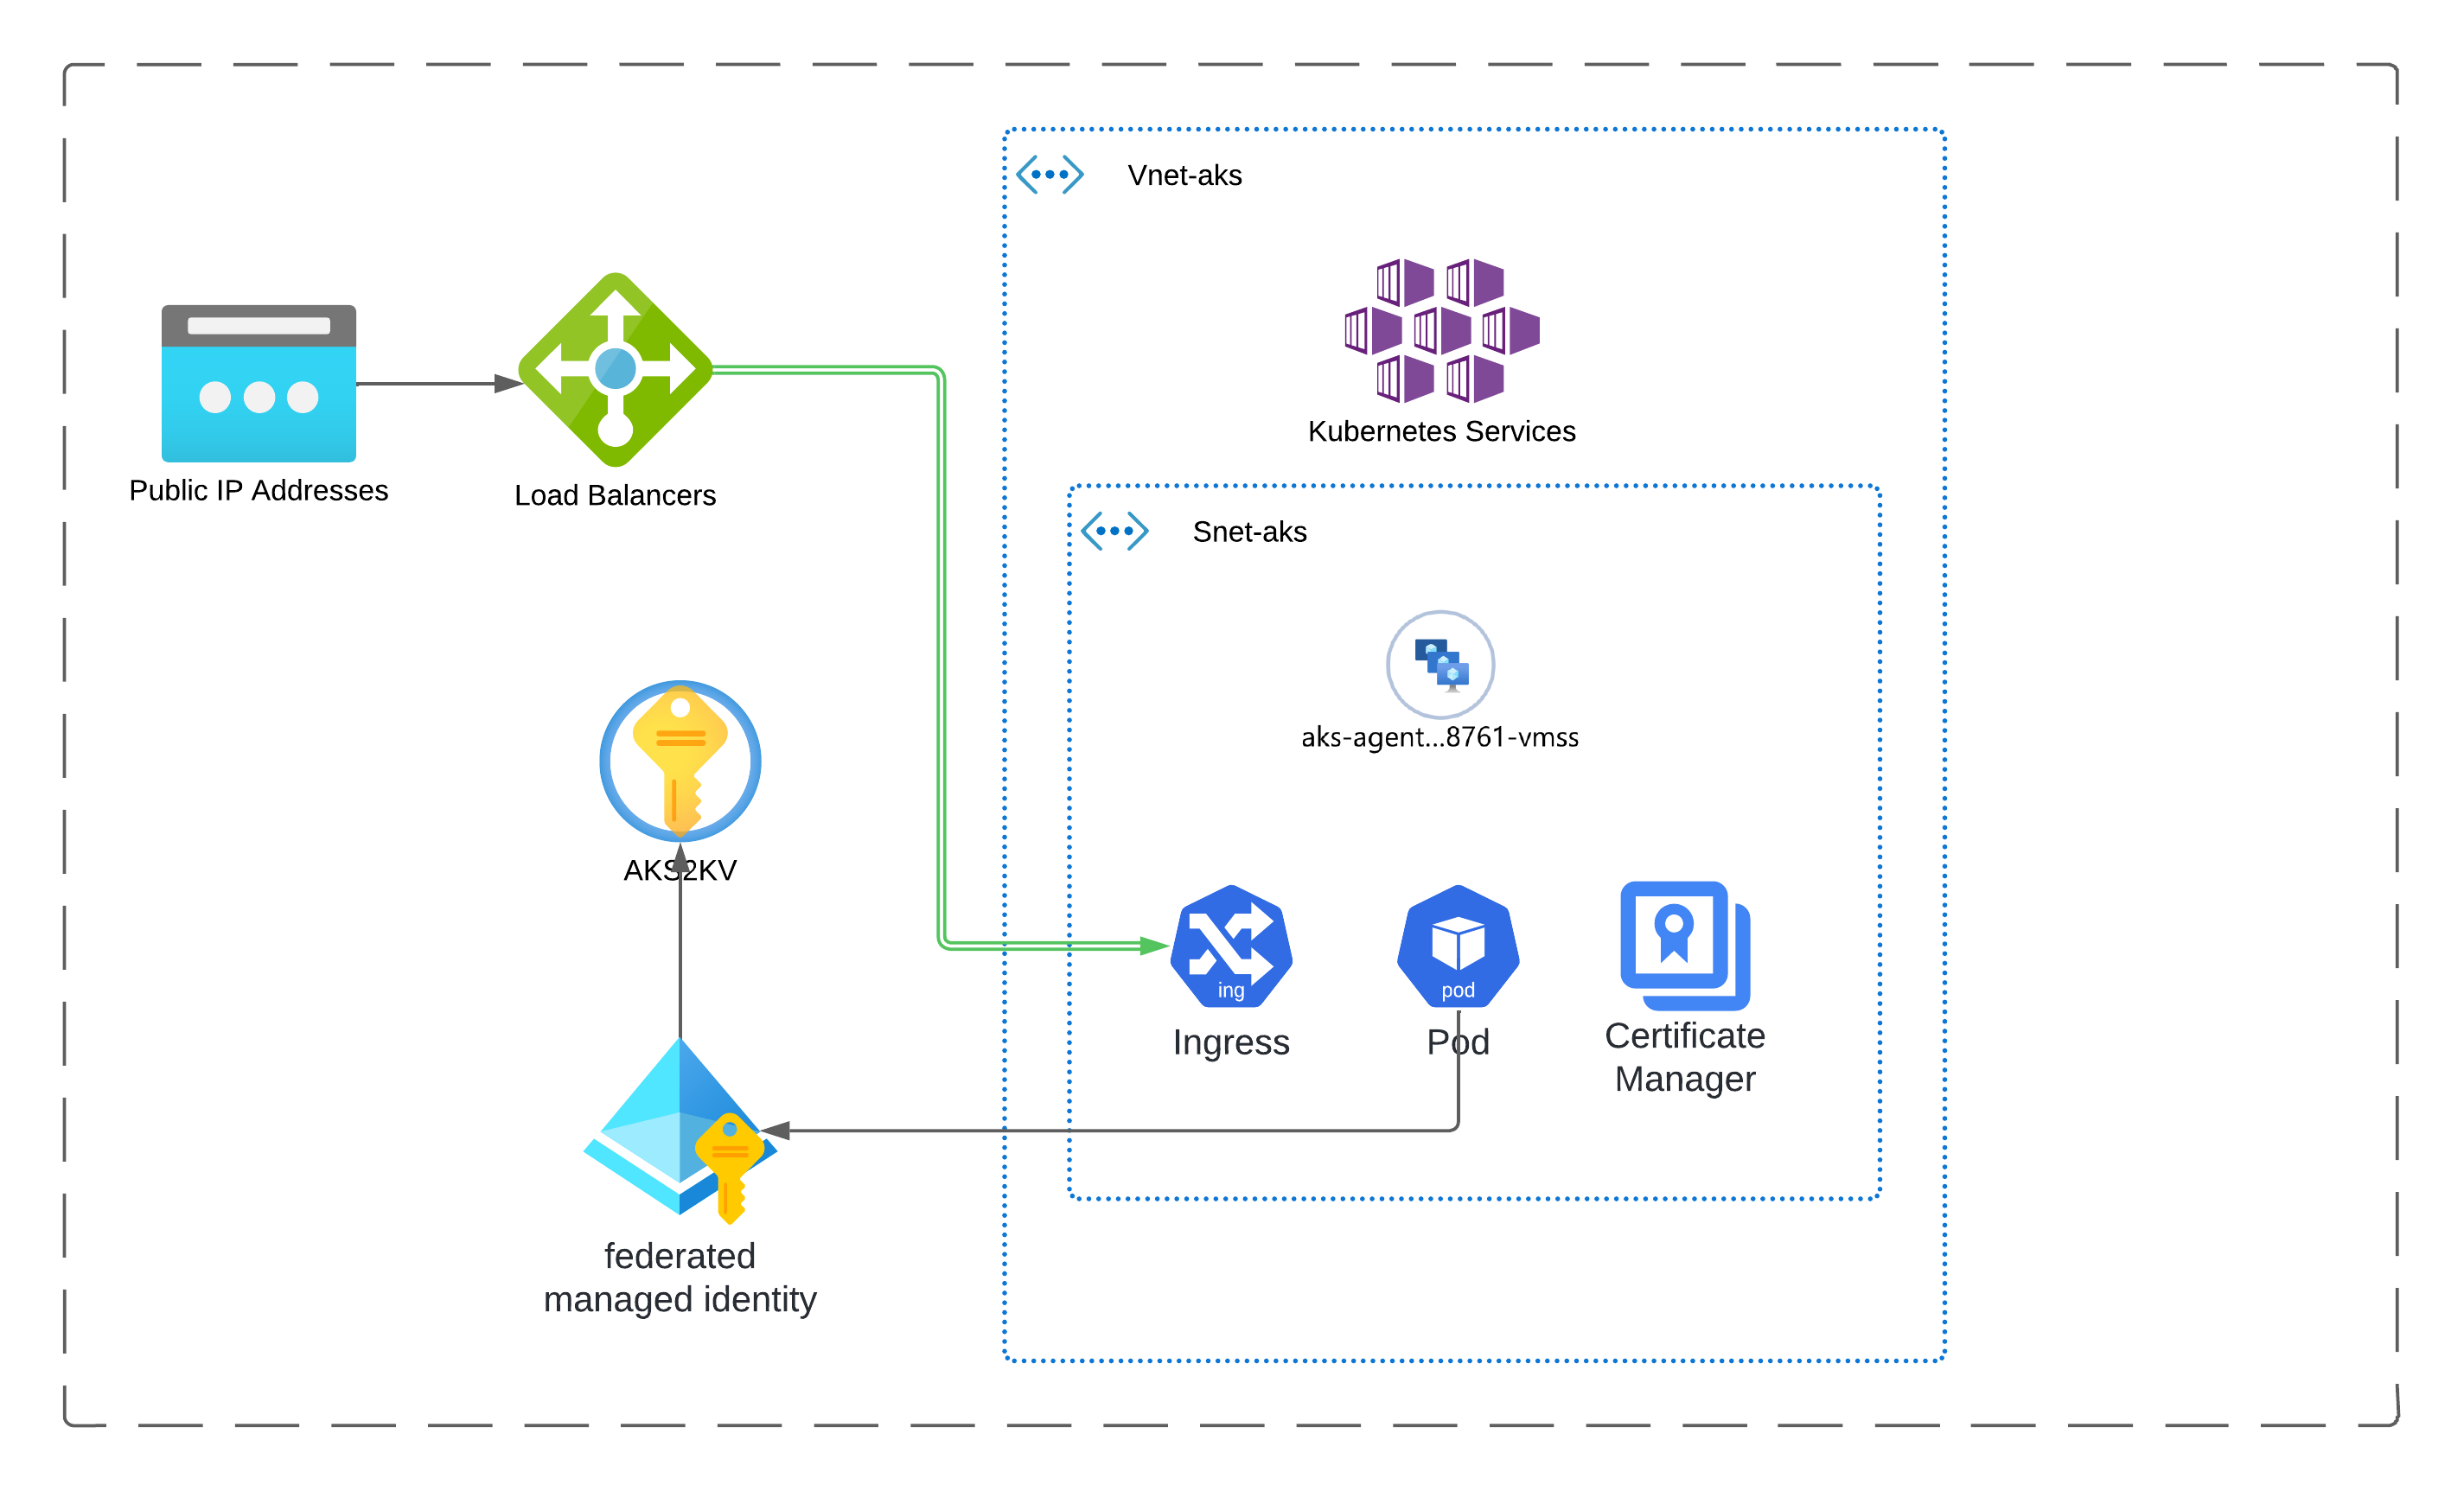
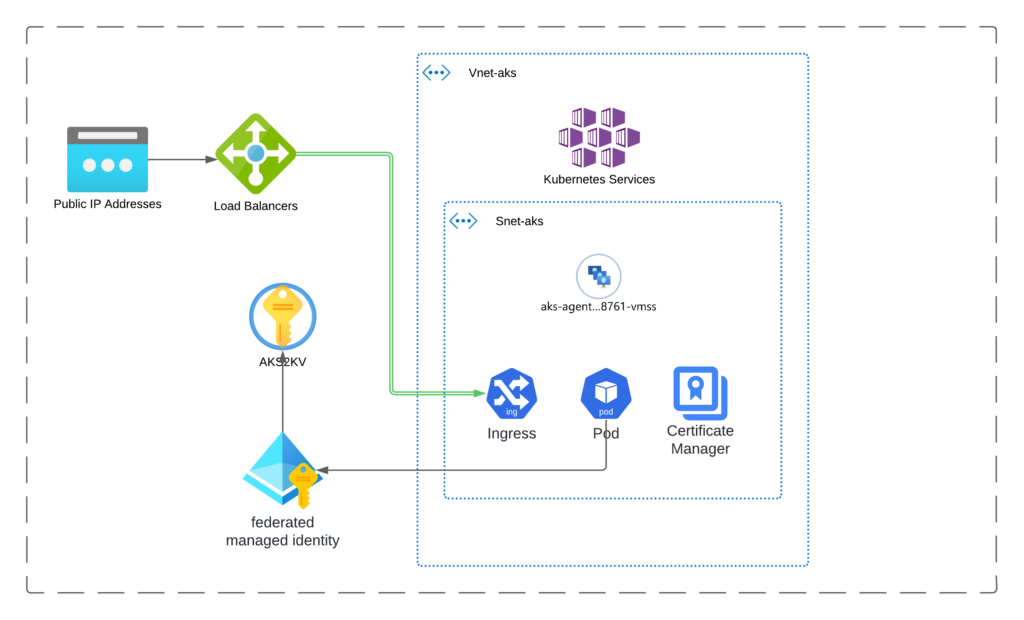
In this blog post, we will be working togheter to provision an Azure Kubernetes services AKS with a public load balancer using Terraform, and TLS certificate for the application in a staging or a production environment. The core components in scope are:
- Terraform – Structure
- AKS
- Load Balancer
- Ingress-Controller
- Cert-Manager
- Let’s Encrypt
- Key Vault
The prerequisites for this project are :
- Azure CLI
- Terraform
- Helm CLI
- Kubectl CLI
- Azure Service Principal
- Azure Storage Account
Architecture Overview
Full Code Repository
To follow up on this set up , you will find the final code here
Creating prerequisites for AKS
Before we can start deploying an AKS cluster using Terraform, we need the following prerequisites:
- We need an Azure account with an active subscription. If you don’t have one, create an account for free.
- Provide Terraform authentication to Azure via a service principal:
- Run the following script to create the SP:az ad sp create-for-rbac –name terraform-Iac –role Contributor –scopes /subscriptions/<subscription_id>
- Once you create the service principal with the contributor IAM role to your azure subscription. We can specify the ARM_CLIENT_SECRET credential to Terraform via environment variable: export ARM_CLIENT_SECRET=“<service_principal_password>”
- Run the following script to create the SP:
- Manage Terraform State, throught an azure storage account by running the following commands:– az group create -l westeurope -n <rg_name>– az storage account create –name <stAccount_name> –resource-group <rg_name> –access-tier Hot –sku Standard_LRS– az storage container create -n tfstate –account-name <stAccount_name> –auth-mode login
- Once we create the storage account. We have the access key ready to create the environment variable: export ARM_ACCESS_KEY=”<st_account_access_key>”
- Shell Environment: We’re going to use Bash shell to run the code. If you are using Powershell , you can still can export the variable environment using $env:ARM_CLIENT_SECRET. For more information, refer to this Link
Terraform Backend and Providers
To start using Terraform, you must first set up the backend, which is the storage location for the Terraform state. Next, you need to configure a provider that enables Terraform to import and manage API resources and authenticate with service providers such as Azure.
- Backend Configuration:
#=========================
# Backend Configuration
#=========================
terraform {
     backend "azurerm" {
             storage_account_name = "<Replace your storage account name>"
             container_name = "tfstate"
         }
}
Replace the storage_account_name value with the name of your remote state storage account.
2. Providers Configuration:
#=========================
# Provider Configuration
#=========================
terraform {
    required_version = ">=1.0"
    required_providers {
        azurerm = {
            source = "hashicorp/azurerm"
            version = "~> 3.0"
        }
         }
}
provider "azurerm" {
       features {}
       tenant_id = var.tenant_id
      client_id = var.terraform_sp
      subscription_id = var.subscription_id
}
The Azure provider block defines the syntax for specifying the authentication details for your Azure subscription. This details are typically stored in variable files that you need to update according to your configuration.
#=========================
# Environment Vars - global
#=========================
tenant_id =<Replace your tenant ID>"
terraform_sp ="<Replace your SP>"
location = "northeurope"
application_code = "aksPoc"
unique_id = "0000111"
#=========================
# Environment Vars - prd
#=========================
environment = "prd"
subscription_id = "0a12401e-dad1-42a9-88f2-d8edd74a1696" # UPDATE HERE.
Initialise Terraform
At this point, we can initialize Terraform. Make sure you are at the root level of your project directory.
terraform init -reconfigure -backend-config="key=env-prd.tfstate"
Validate Terraform
Once we’ve confirmed that Terraform initialization is successful, we can proceed to validate our Terraform project.
terraform validate
Azure Resource Group
We need to create our resource group, which will contain all the Azure resources.
"azurerm_resource_group" "rg" {
       location = var.location
       name = "${var.resource_group_name_prefix}-${var.environment}-${var.application_code}-${var.unique_id}"
}
Azure Vnet and Subnets
In this step, we will create a virtual network 192.168.0.0 with a CIDR of /16, and a subnet for our AKS cluster with the /24 CIDR.
# Create a vnet.
resource "azurerm_virtual_network" "vn" {
      name = var.vnet["aks"]["vnet_name"]
      location = local.aks-rg-location
      resource_group_name = local.aks-resources-rg
      address_space = [var.vnet["aks"]["vnet_cidr"]]
}
# Create a subnet for aks nodes and pods.
resource "azurerm_subnet" "subnet_aks" {
       name = var.vnet_subnets["aks"]["sub_name"]
       resource_group_name = local.aks-resources-rg
       virtual_network_name = azurerm_virtual_network.vn.name
       address_prefixes = [var.vnet_subnets["aks"]["sub_cidr"]]
}
Managed Identity
A key concept in managing access identity in Azure Kubernetes Service (AKS) is how to enable your AKS workloads to securely access various Azure services, such as Key Vault for secrets management.
First, we create a user-assigned identity for our AKS cluster. Next, we assign to this identity the necessary permissions using Role-Based Access Control (RBAC).
resource "azurerm_user_assigned_identity" "uai_aks" {
          name = var.uai_name_aks
          resource_group_name = local.aks-resources-rg
          location = local.aks-rg-location
}
resource "azurerm_role_assignment" "aks_network_contributor" {
           depends_on = [azurerm_kubernetes_cluster.k8s]
           principal_id =        azurerm_kubernetes_cluster.k8s.kubelet_identity[0].object_id
           role_definition_name = "Network Contributor"
           scope = local.aks-resources-nrg-id
}
## KV
resource "azurerm_key_vault_access_policy" "kv_user_assigned_identity" {
           depends_on = [azurerm_user_assigned_identity.uai_aks]
           key_vault_id = azurerm_key_vault.aks_kv.id
           tenant_id = var.tenant_id
           object_id = azurerm_user_assigned_identity.uai_aks.principal_id
           secret_permissions = ["Get", "List", "Set", "Delete"]
}
AKS Configuration
Next, we focus on our primary resource, the AKS cluster. In this setup, we establish the foundational configuration of an AKS cluster suitable for development and testing. Additionally, we enable federated identity with the OpenID Connect (OIDC) issuer for the cluster.
# Create the aks cluster.
resource "azurerm_kubernetes_cluster" "k8s" {
            depends_on = [
                    azurerm_resource_group.rg
              ]
            location = local.aks-rg-location
            resource_group_name = local.aks-resources-rg
            node_resource_group = local.aks-resources-nrg
            name = local.aks-name
            dns_prefix = local.aks-dns-prefix
# For workload identity
            oidc_issuer_enabled = true
            workload_identity_enabled = true
# Set the default node pool config.
             default_node_pool {
                 name = "agentpool"
                 node_count = "1"
                 vm_size = "Standard_B2s"
                 vnet_subnet_id = azurerm_subnet.subnet_aks.id # Nodes and pods will receive ip's from here.
}
# Set the identity profile.
              identity {
                 type = "UserAssigned"
                 identity_ids = ["${azurerm_user_assigned_identity.uai_aks.id}"]
}
              key_vault_secrets_provider {
                 secret_rotation_enabled = true
}
               role_based_access_control_enabled = true
# Set the network profile.
               network_profile {
                     network_plugin = "azure"
                    network_policy = "azure"
        }
}
// federated identity object
resource "azurerm_federated_identity_credential" "this" {
         depends_on = [azurerm_kubernetes_cluster.k8s]
         name = "aksfederatedidentity"
         resource_group_name = local.aks-resources-rg
         audience = ["api://AzureADTokenExchange"]
         issuer = azurerm_kubernetes_cluster.k8s.oidc_issuer_url
         parent_id = azurerm_user_assigned_identity.uai_aks.id
         subject = "system:serviceaccount:default:aks01-identity-sa" # UPDATE based on system:serviceaccount:namespace/sa
}
Key Vault
We’ll start by creating a Key Vault to securely store the secrets needed by our AKS application. In the Kubernetes deployment, we will use the CSI (Container Storage Interface) driver to import these secrets directly into our pods.
resource "azurerm_key_vault" "aks_kv" {
   name = "${var.kv_name}-${var.random_string_kv}"
   location = local.aks-rg-location
   resource_group_name = local.aks-resources-rg
   tenant_id = var.tenant_id
   soft_delete_retention_days = 7
   purge_protection_enabled = false
   sku_name = "standard"
}
resource "azurerm_key_vault_access_policy" "kv_user_assigned_identity" {
   depends_on = [azurerm_user_assigned_identity.uai_aks]
   key_vault_id = azurerm_key_vault.aks_kv.id
   tenant_id = var.tenant_id
   object_id = azurerm_user_assigned_identity.uai_aks.principal_id
   secret_permissions = ["Get", "List", "Set", "Delete"]
}
resource "azurerm_key_vault_access_policy" "this" {
   key_vault_id = azurerm_key_vault.aks_kv.id
   tenant_id = data.azurerm_client_config.current.tenant_id
   object_id = data.azurerm_client_config.current.object_id
   secret_permissions = ["Get", "List", "Set", "Delete", "Purge"]
}
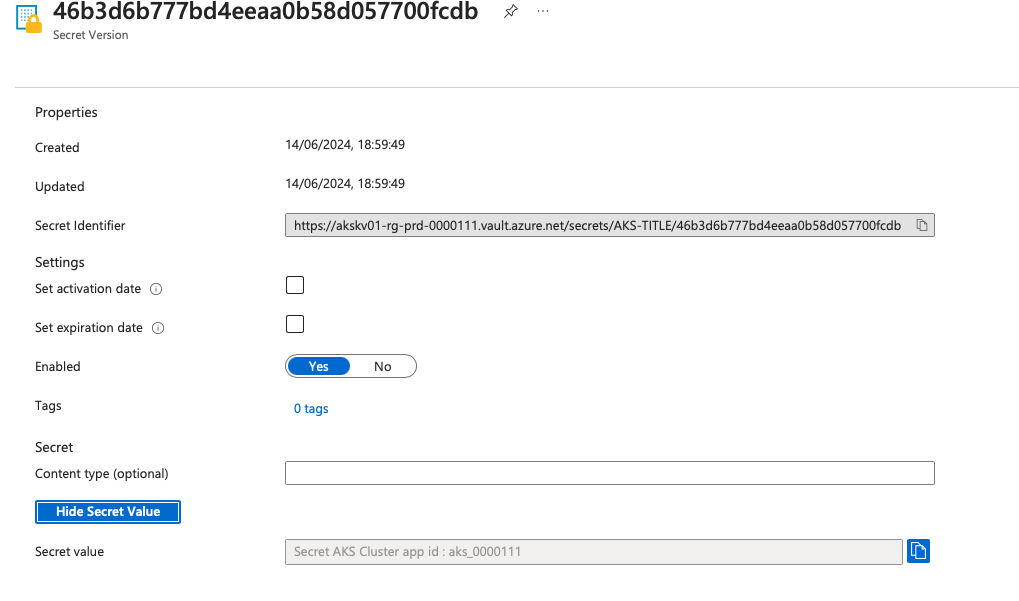
resource "azurerm_key_vault_secret" "aks_app_secrets" {
   name = "aks-title"
   value = "Secret AKS Cluster app id : aks_0000111"
   key_vault_id = azurerm_key_vault.aks_kv.id
   depends_on = [
     azurerm_key_vault.aks_kv,
     azurerm_key_vault_access_policy.this
    ]
}
The secrets will be stored in the created Key Vault using the following format:
Ingress Controller using TLS Certificate
The ingress controller will handle all Layer 4 network traffic directed to the public load balancer, routing it based on the host path. We will deploy this resource using a Helm release.
To begin, we need to import the Helm provider for Terraform and configure it to authenticate with our AKS cluster properly.
provider "helm" {
# debug = true
  kubernetes {
    host = data.azurerm_kubernetes_cluster.main_aks.kube_config[0].host
    client_key = base64decode(data.azurerm_kubernetes_cluster.main_aks.kube_config[0].client_key)
    client_certificate =   base64decode(data.azurerm_kubernetes_cluster.main_aks.kube_config[0].client_certificate)
    cluster_ca_certificate = base64decode(data.azurerm_kubernetes_cluster.main_aks.kube_config[0].cluster_ca_certificate)
         }
}
Here, you need to specify the configuration for your DNS zone and override the ingress application name in the local file.
dns-name = "lkhabir.com"
ingress-name = "devops4u-tech"
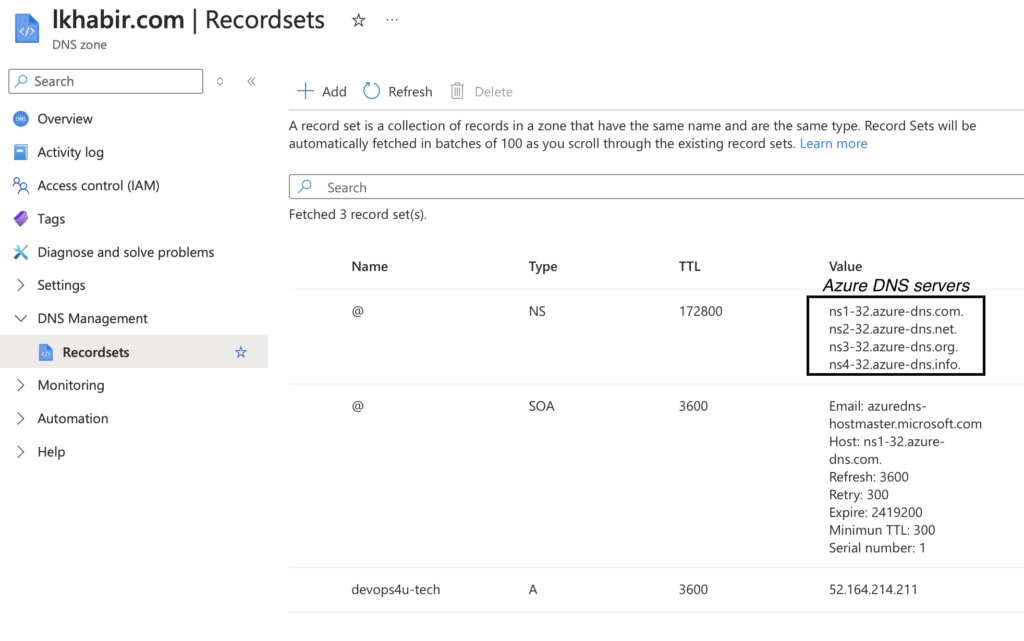
After creating your DNS zone in Azure, you need to update the DNS resolver settings with your domain provider to point to the Azure DNS servers. This will ensure that your domain is correctly routed to Azure’s DNS infrastructure.
We will use Let’s Encrypt to obtain a staging certificate. Ensure that you update the cert-manager and certificat manifests with your email information and the DNS names you intend to use.
apiVersion: cert-manager.io/v1
kind: ClusterIssuer
metadata:
   name: letsencrypt-staging-01
spec:
   acme:
     email: chahid.ks.hamza@gmail.com
     server: https://acme-staging-v02.api.letsencrypt.org/directory
     privateKeySecretRef:
        name: letsencrypt-staging-issuer-account-key-01
     solvers:
     - http01:
        ingress:
         ingressClassName: ingress-nginx
##
apiVersion: cert-manager.io/v1
kind: Certificate
metadata:
     name: staging-devops4u-tech
spec:
    secretName: stagingdevops4u-tech-tls
    dnsNames:
       - "devops4u-tech.lkhabir.com"
    issuerRef:
       name: letsencrypt-staging-01
       kind: ClusterIssuer
Next, we will create a public IP address to associate with our load balancer, which will handle all ingress traffic. We will also set up a DNS record to link the application’s domain to this load balancer.
resource "azurerm_dns_zone" "ingress-public" {
       name = local.dns-name
       resource_group_name = local.aks-resources-rg
}
resource "azurerm_dns_a_record" "ingress-public-A-record" {
       depends_on = [azurerm_kubernetes_cluster.k8s, azurerm_public_ip.lbic_pip]
       name = local.ingress-name
       zone_name = azurerm_dns_zone.ingress-public.name
       resource_group_name = local.aks-resources-rg
       ttl = 3600
       records = [azurerm_public_ip.lbic_pip.ip_address]
}
resource "azurerm_public_ip" "lbic_pip" {
       depends_on = [local.aks-resources-nrg]
       name = "loadbalancer-ingressController-pip"
       location = local.aks-rg-location
       resource_group_name = local.aks-resources-nrg
       allocation_method = "Static"
       sku = "Standard"
}
resource "helm_release" "ingress_nginx_controller" {
       depends_on = [azurerm_kubernetes_cluster.k8s,azurerm_public_ip.lbic_pip]
       name = local.nginx-ingress-name
       repository = "https://kubernetes.github.io/ingress-nginx"
       chart = "ingress-nginx"
       namespace = "ingress"
      create_namespace = true
      values = [
          templatefile("./ingress-controller/values.yml",
         { pip_rg_name = local.aks-resources-nrg }
    )
     ]
      set {
       name = "controller.service.loadBalancerIP"
       value = azurerm_public_ip.lbic_pip.ip_address
}
      lifecycle {
       create_before_destroy = false
   }
}
Kubernetes Deployment
In this section, we set up a k8s folder containing the AKS application, which will be exposed through an ingress controller and a public load balancer. We also configure cert-manager and certificate resources to issue a CA certificate for our application domain, using a staging Let’s Encrypt issuer in this case. Additionally, we create a service account that leverages federated identity for workload authentication and define a SecretProviderClass to enable access to secrets stored in our Key Vault via a storage container interface.
The service account and SecretProviderClass require two key inputs: the client ID of the user-assigned identity for the AKS cluster and the tenant ID of your Azure subscription. To automate this setup, we use the local_file provider in Terraform. This provider will automatically replace the placeholders ${uai-aks-clientid} and ${tenant_id} with the correct values. After setting these values, we execute the k8s_deploy.sh script to apply all the configuration files in the k8s directory.
resource "local_file" "templates" {
      depends_on = [
         azurerm_user_assigned_identity.uai_aks
]
      for_each = fileset(path.module, "k8s/*.yaml")
      content = templatefile(each.key, {
      uai-aks-clientid = azurerm_user_assigned_identity.uai_aks.client_id
      tenant_id = var.tenant_id
})
      filename = "${path.module}/${each.key}"
}
resource "null_resource" "k8s_deploy" {
      depends_on = [
         azurerm_kubernetes_cluster.k8s,
         azurerm_key_vault.aks_kv,
         helm_release.ingress_nginx_controller,
         helm_release.cert_manager,
         local_file.templates
]
      triggers = {
         shell_hash = "${sha256(file("${path.module}/k8s_deploy.sh"))}"
}
      provisioner "local-exec" {
          command = "sleep 120; chmod +x ./k8s_deploy.sh; ./k8s_deploy.sh"
          interpreter = ["/bin/bash", "-c"]
    }
}
Launch Terraform infrastructure
Previously, we discussed the key components of our architecture that will host a sample application. Now, to put this into practice, we can start by running terraform plan -var-file=""vars/global.tfvars -var-file="vars/env-prd.tfvars" to preview the resources that will be created in Azure. Once reviewed, we proceed with terraform apply -var-file="vars/global.tfvars" -var-file="vars/env-prd.tfvars" --auto-approve to set up the infrastructure.
Important:
If the terraform apply command does not complete successfully and you encounter the error:
Error: Kubernetes cluster unreachable: Get “https://aks-prd-akspoc-0000111-dns-v1kna1t5.hcp.northeurope.azmk8s.io:443/version”
you should run the following command before attempting a second terraform apply:
az account set --subscription <YOUR_SUBSCRIPTION_ID>
az aks get-credentials --resource-group rg-prd-aksPoc-0000111 --name aks-prd-aksPoc-0000111 --overwrite-existing
Putting all togheter
Once you launch your terraform apply command, all the steps mentioned above will be carried out automatically, from provisioning Azure infrastructure to deploying the kubernetes application. Following with the HTTP-01 challenge to obtain the certificate, you will be able to see the live application that reads secrets from the Key Vault.


Clean UP
To avoid incurring additional costs, you can remove all the infrastructure and the application by running the following command:
terraform destroy -var-file="vars/global.tfvars" -var-file="vars/env-prd.tfvars" --auto-approve


