Monitoring and Alerting on Azure AD App Client Secret and Certificate Expirations
Introduction
Azure App Registration is a fundamental feature of Azure Active Directory (Azure AD), allows organizations to register applications that need to authenticate and interact with resources in Azure.
Azure Active Directory (Azure AD) is Microsoft’s cloud-based identity and access management platform. This platform enables secure access to resources and applications within the Azure ecosystem. To authenticate and authorize applications or services, users must register them in Azure AD. This process is critical for leveraging Microsoft Entra ID, which facilitates identity-driven security for cloud resources.
An Azure App Registration, commonly referred to as a Service Principal, is an essential component of modern DevOps practices, especially when dealing with Infrastructure as Code (IaC) and CI/CD pipelines. Service principals allow applications to interact with Azure resources without human intervention, enabling automation across various tasks, from infrastructure provisioning to deployment pipelines.
When you register an application in Azure AD, two distinct objects are created within the Azure AD tenant:
- Application Object: This defines the application’s identity and metadata, such as the application’s name and permissions.

- Service Principal Object: This is the specific identity for the application within a tenant and is used by applications to access Azure resources. It’s a local instance of the application object and provides the necessary authentication within the Azure environment.

By integrating these objects, organizations can securely manage identity and access for their applications while automating their workflows efficiently. However, managing the credentials (client secrets and certificates) associated with these service principals is critical to maintaining security. Client secrets and certificates have expiration dates, and failure to monitor them can lead to service disruptions or security risks.
Types of Permissions
When configuring an Azure AD App Registration, it is crucial to define the appropriate permissions that the application will need to interact with Azure resources. Azure provides a wide range of permissions that can be assigned based on the specific APIs or services the application will access. The process begins by selecting the API (such as Microsoft Graph API or Azure Management API) and then defining the required permissions.
Permissions in Azure AD are categorized into two types:
Delegated Permissions
Delegated permissions are used when the application acts on behalf of a signed-in user. This means that the application is granted permission to perform actions that the user would typically be allowed to do. These permissions require user consent and depend on the user’s roles and permissions within the organization.
For instance, if a user has read access to their email via the Microsoft Graph API, an application with delegated permissions can access the same data, but only while the user is authenticated. This type of permission is common in apps that operate within the context of user identity, such as web and mobile applications that require user interaction and authentication.
Application Permissions
Application permissions allow an application to operate autonomously, without requiring a signed-in user. These permissions are typically used for background services or daemons that run without user interaction. As the application operates independently, it requires high access and therefore does not depend on the user’s identity or consent.
This type of permission is particularly useful for applications like automation scripts, services, or back-end applications that need to access resources without user involvement.
How to monitor Azure app registration secrets expiry ?
Ensuring that Azure App Registration secrets and certificates do not expire unexpectedly is critical for maintaining seamless operations and avoiding service disruptions. Several approaches can be used to monitor these expirations :
Approaches:
- Using Logic Apps Designer and Functions App.
- Using Azure Devops Pipeline.
- Using Azure automation accounts.
- Using paid monitoring tools
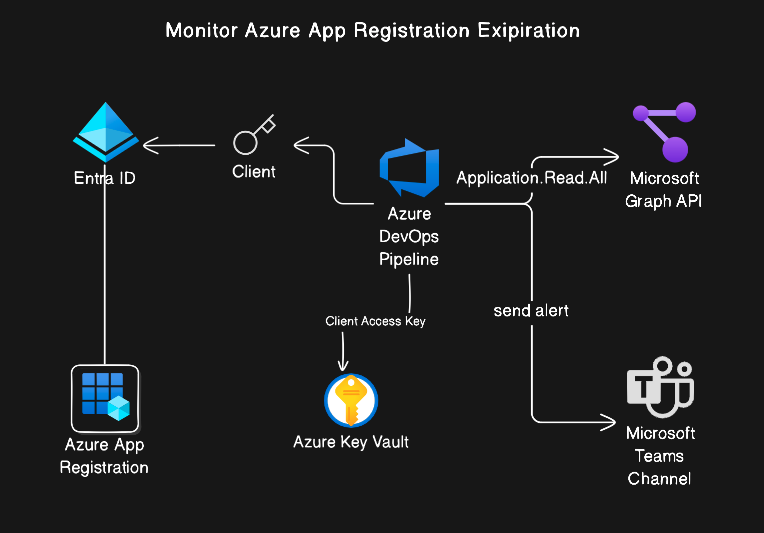
Each method has its strengths, but we’ll be focusing on a cost-effective solution using Azure DevOps Pipelines to automate monitoring and notify teams before secrets expire via the Microsoft Team channel.
Step-by-Step Guide to Setting Up the Azure DevOps Pipeline for Monitoring Secrets Expiry
Step 1: Provision an Azure AD App Registration
Start by creating an Azure App Registration that will be used to authenticate the Azure DevOps Pipeline. This app registration will be granted the necessary API permissions to access the required information about other app registrations in your Azure AD tenant.
- Go to Azure Portal → Azure AD → App registrations → New registration.
- Provide a Name, select Accounts in this organizational directory only for the tenant scope, and register the app.
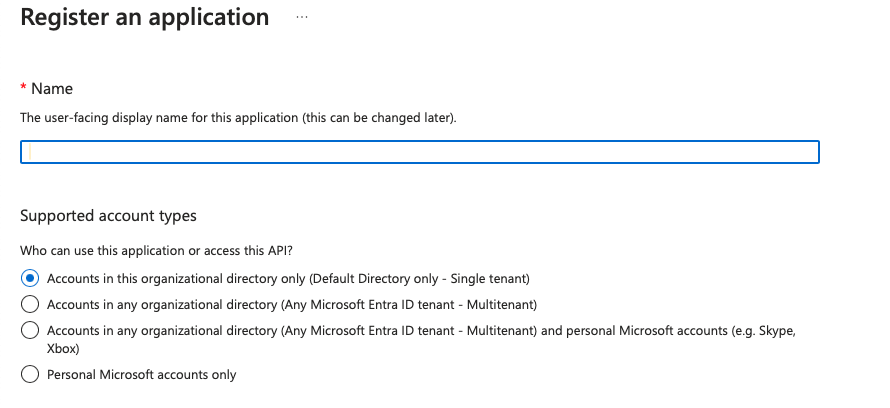
- Note the Application (client) ID and Directory (tenant) ID, as you will need them later in the Key Vault and the pipeline configuration.
Step 2: Provision an App Registration Secret
After registering the app, create a client secret for it, which will be used to authenticate API requests. The secret will expire based on your configuration (1 year, 2 years, etc.), but you must track this secret’s expiration along with other secrets.
- Go to Certificates & secrets → New client secret.

- Note the secret value, as it will be stored in the Key Vault Later and used in the DevOps pipeline.
Step 3: Configure App Registration API Permissions
Next, you need to configure the app registration with the necessary permissions to access and retrieve information about other Azure AD app registrations.
- Navigate to API permissions → Add a permission → Microsoft Graph → Application permissions.

- Grant the Application.Read.All permissions, which will allow the pipeline to read information about app registrations.
- Grant admin consent to these permissions.

Step 4: Provision Azure Key Vault
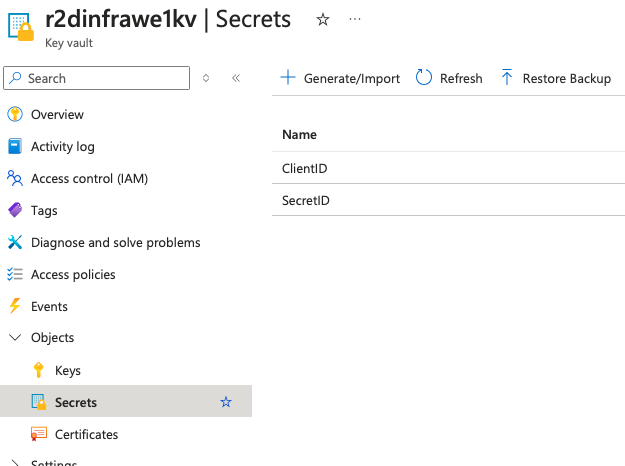
For secure handling of credentials, store the client ID and the client secret information in Azure Key Vault. The DevOps pipeline will retrieve these secrets from the Key Vault during execution.
- Go to Azure Key Vault → Create a new Key Vault or use an existing one.
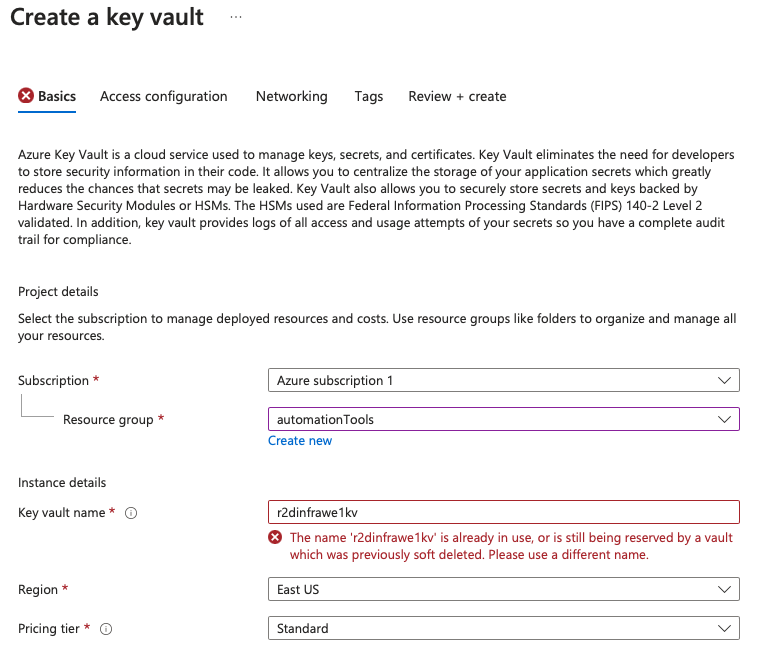
- Store the Secret ID and client ID generated in step 2 in the Key Vault as secrets.
Step 5: Configure the Azure DevOps Pipeline
In this step, we’ll walk through configuring an Azure DevOps pipeline that automates the monitoring of Azure AD App Registration secrets and certificates. By leveraging an existing pipeline YAML file and integrating it with your GitHub repository, you can continuously monitor secrets and send alerts through Microsoft Teams when they are close to expiration.
1. Fork the Repository
The first step is to create a copy of the repository that contains the Azure DevOps pipeline configuration and PowerShell script. This can be done using GitHub’s Fork functionality, which allows you to maintain your version of the repository under your own GitHub account. Here’s how to fork the repository:
- Navigate to the original repository (in this case,
aad-expiration-monitoring) on GitHub. - Click the Fork button in the upper-right corner of the repository page. This creates a personal copy of the repository under your GitHub account.
- Once forked, you will have a full copy of the repository that you can modify and link to your Azure DevOps pipeline.
- Navigate to the original repository (in this case,
2. Create a New Pipeline in Azure DevOps
Next, we’ll set up a new pipeline in Azure DevOps and connect it to the forked GitHub repository. The pipeline will use a YAML configuration file to automate the monitoring process.
- Log in to Azure DevOps and navigate to your project.
- Go to the Pipelines section and click Create Pipeline.

- Select GitHub as the source repository type.
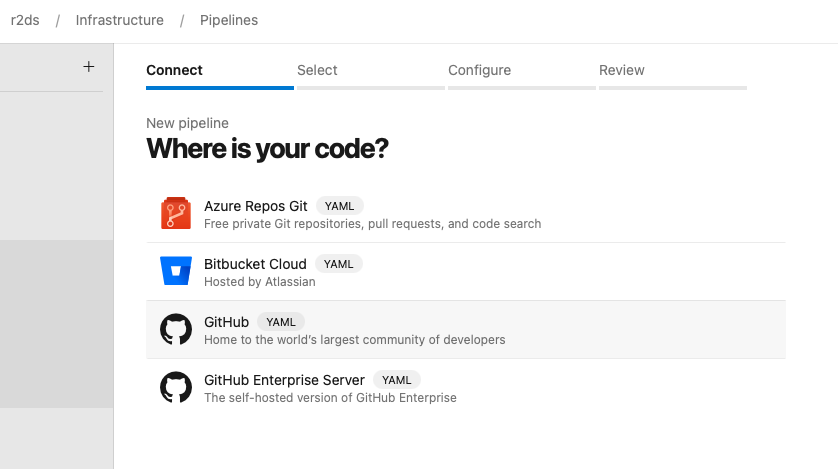
- Authenticate with GitHub if prompted and select your forked repository (
aad-expiration-monitoring) from the list.
- After selecting the repository, you’ll be prompted to configure the pipeline.
3. Configure the Pipeline Using an Existing YAML File
The pipeline configuration is stored in a YAML file within the repository. This file contains the instructions that the pipeline will execute to monitor app secrets.
- When prompted, choose the option to Use an existing Azure pipeline YAML file.
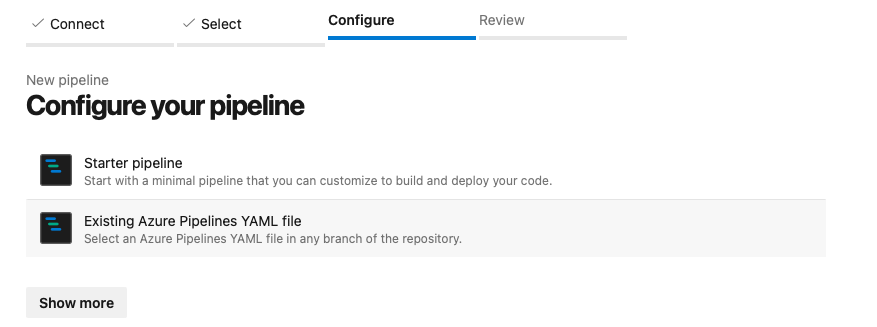
- Select the appropriate branch (typically
mainormaster), and then select the path to the YAML file that defines the pipeline configuration.
- Click Save to finalize the pipeline configuration.
- When prompted, choose the option to Use an existing Azure pipeline YAML file.
4. Creating an Azure Resource Manager Service Connection in Azure DevOps
To allow the Azure DevOps pipeline to securely interact with Azure resources such as the Key Vault, you need to create an Azure Resource Manager (ARM) Service Connection. This service connection will authenticate the pipeline and allow it to retrieve secrets or certificates from the Key Vault. Here’s how to create one:
Navigate to Azure DevOps:
- Open your Azure DevOps project.
- In the left sidebar, click on Project Settings at the bottom.
- Under Pipelines, select Service connections.
Create a New Service Connection:
- Click on the New service connection button and select Azure Resource Manager from the dropdown menu.

- In the next step, choose Service principal (automatic), which will allow Azure DevOps to automatically create a service principal and configure the connection.
- Click on the New service connection button and select Azure Resource Manager from the dropdown menu.
Select Your Azure Subscription:
- In the subscription dropdown, choose the Azure subscription where your resources (including the Key Vault) are located.
- Provide a Service connection name.
- Click Verify and save to complete the creation of the service connection.
Granting IAM Permissions to Azure Key Vault
After the service connection is created, it needs appropriate permissions to access your Key Vault. Here’s how to grant access:
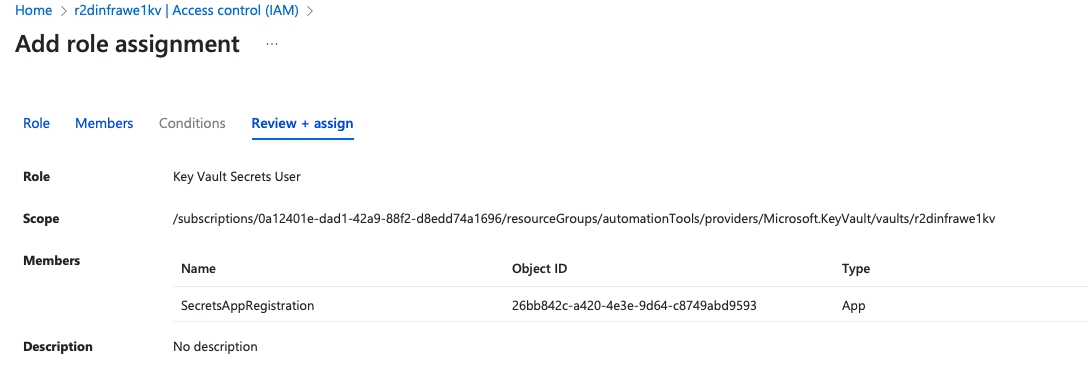
- Go to the Azure Portal and navigate to the Key Vault you provisioned in Step 4.
- In the left-hand menu, click Access Control (IAM).
- Click on Add role assignment.
- Choose the Key Vault Secrets User or Key Vault Secrets Officer role, depending on the level of access you want to grant.
- Under Assign access to, select User, group, or service principal.
- In the search bar, type the name of the service principal created during the service connection setup (this can be found in Azure Active Directory under App registrations in the Azure Portal).
- Select the correct service principal and click Save to finalize the role assignment.
5. Adapt the code repository
Before running the pipeline, it’s necessary to update the configuration in the YAML file to reflect your Azure environment. This includes updating the Key Vault Name, INFRA_SERVICE_CONNECTION, and the Agent Pool. The service connection allows the Azure DevOps pipeline to securely access the Azure Key Vault and other Azure resources, while the agent pool defines where the pipeline runs.
Update the Key Vault Name, Service Connection, and Agent Pool
The job-GetEntraAppRegistrations.yml file contains the parameters for accessing your Azure Key Vault, using the service connection, and specifying the agent pool. Follow these steps to make the necessary updates:
- Navigate to your forked repository on GitHub.
- Locate the
job-GetEntraAppRegistrations.ymlfile, typically found in thepipelinesdirectory. - Edit the YAML file by clicking on the pencil icon.
In the file, look for the sections where the Key Vault Name, INFRA_SERVICE_CONNECTION, and Agent Pool are defined, and update them as follows:
- Replace
KeyVaultNamewith the actual name of the Key Vault you created in Step 4. - Replace
Infra_Serive_Connectionwith the name of the service connection that you’ve set up in Azure DevOps Service Connection to allow the pipeline to access Azure Key Vault securely. - If you are using a self-hosted agent, ensure that the
poolsection references the correct agent name, such asazuredevopsagent1. If you’re using Microsoft-hosted agents, you can replace thenamewith default Microsoft-hosted agents. Ensure that the agent pool used in the Azure DevOps pipeline is configured to run on a Microsoft-hosted agent with a Windows OS for compatibility with the required tasks.
- Replace
Save the Changes
Once you’ve made the changes, click Commit changes to save the updates to your repository.
6. Configure the Microsoft Teams Webhook
Before running the pipeline, ensure that the Webhook URL is set up in your Microsoft Teams channel. This link shows how it can be done.
7. Run the pipeline
Once the pipeline is saved, you’re ready to run it for the first time and provide the necessary parameters for monitoring your app secrets.
Navigate to the Pipelines section in Azure DevOps and click on the All Pipelines tab.
You should see the saved pipeline with the name of the repository (
aad-expiration-monitoring).Click on the pipeline name, and then click Run Pipeline.
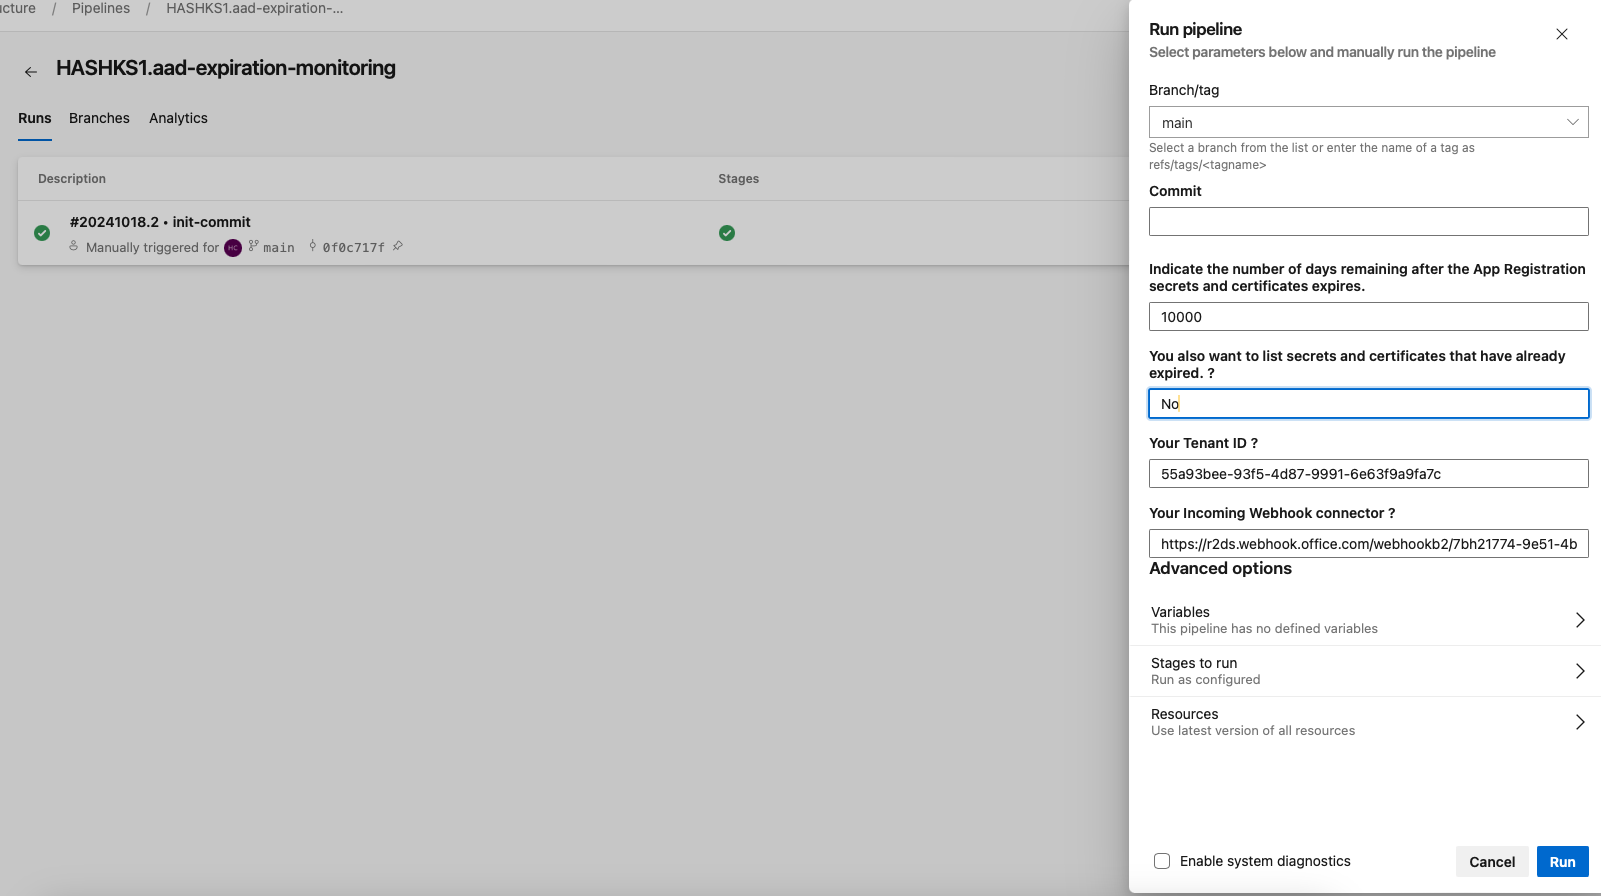
When prompted, you’ll be presented with several parameters to customize the execution of the pipeline:
- Branch/Tag: Choose the branch or tag to use for the pipeline run. In most cases, this will be
mainormaster, but you can specify any valid branch if necessary. - Optional Commit: If you want to run the pipeline against a specific commit, you can provide the commit hash here.
- Monitoring Parameters: The pipeline will request specific input parameters for the PowerShell script:
- Number of Days: Specify the number of days before expiration to trigger the alert. For example, you may want to receive notifications for app secrets expiring in the next 30 days.
- Include Already Expired App Registrations: You can choose whether to include app registrations that have already expired in the report. Set this option to
Yesif you want to include expired registrations in the output. - Tenant ID: Provide the Azure AD Tenant ID for the tenant you want to monitor. This ensures that the pipeline runs against the correct Azure environment.
- Microsoft Teams Webhook URL: Enter the Webhook URL that you have already configured in Microsoft Teams. This will be used by the pipeline to send notifications to the specified Teams channel when an app secret is nearing expiration.
- Branch/Tag: Choose the branch or tag to use for the pipeline run. In most cases, this will be
8. Monitor the Pipeline Execution and Notifications
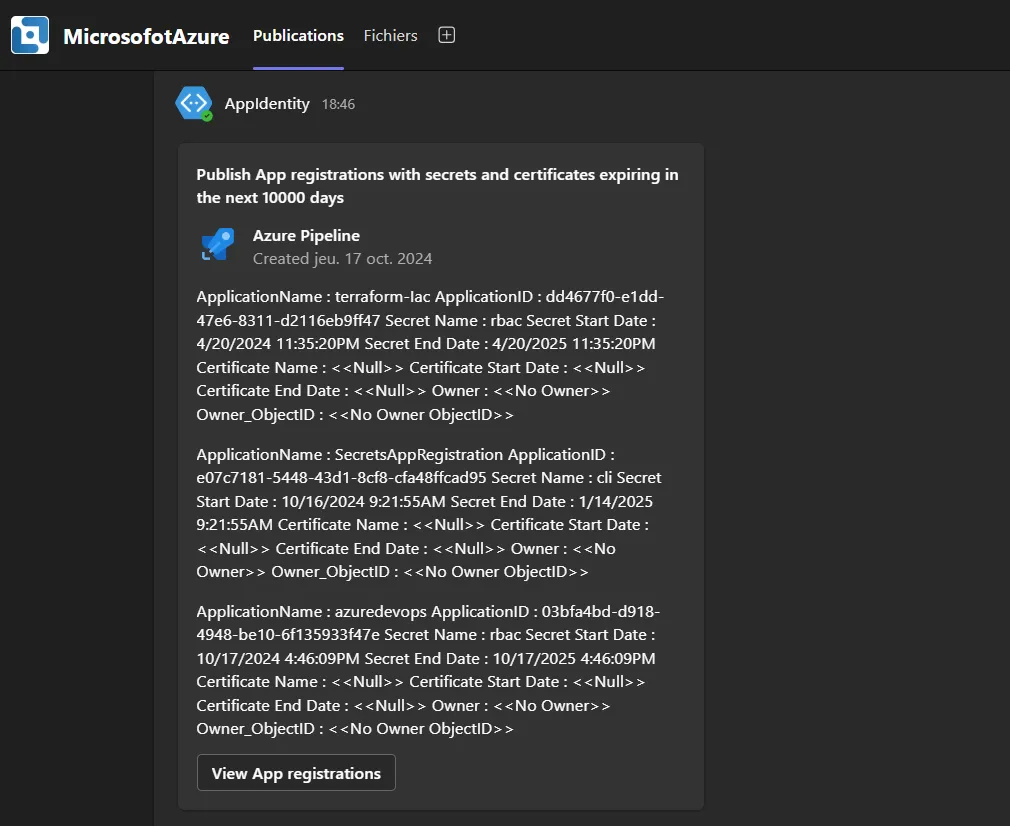
Once the pipeline is triggered, it will execute the PowerShell script, which retrieves information about all app registrations in your Azure AD tenant. The script checks for any secrets or certificates that are set to expire within the specified number of days.
- The pipeline will use the Azure Key Vault to securely retrieve credentials and authenticate against Azure AD.
- The script will then evaluate the expiration dates of each registered app’s secrets and certificates.
- If any secrets are set to expire soon, the pipeline will send a notification to the configured Microsoft Teams channel via the Webhook URL.
You can monitor the pipeline’s execution status directly in Azure DevOps, and view the logs to see which app secrets are nearing expiration. The pipeline will continue running based on the schedule you define (e.g., daily or weekly), ensuring continuous monitoring.
By following these steps, you’ll have a fully automated process in place to monitor Azure AD App Registration secrets and certificates. This solution integrates seamlessly into your DevOps workflow and provides proactive notifications to your team when action is required.
